🎯 How to Log in to cPanel on DomainIndia.com: A Complete Step-by-Step Guide 🌟
Managing your website starts with accessing your hosting control panel, cPanel. Follow this simple guide to effortlessly log in to cPanel on DomainIndia.com and explore its powerful features.
📋 Step-by-Step Instructions to Log in to cPanel
1️⃣ Access DomainIndia.com's Client Area
- Go to the DomainIndia.com Homepage.
- Click on the 'Client Area' menu option.
- Alternatively, visit this link: Client Area Login.
- Enter your email address and password used during registration.
- Click 'Login' to proceed.
- Forgot your password? Click on the "Forgotten your password?" link to reset it.
🖼️ Visual Reference:
2️⃣ Navigate to "My Services"
Once you're logged in to the Client Area:
- Click on the 'Services' menu in the navigation bar.
- Select "My Services".
- This section will show a list of your hosting accounts with their current statuses.
- Find your desired hosting account and click the 'Active' button.
🖼️ Visual Reference:
3️⃣ Access cPanel
Once inside your hosting account:
- Look for the "Login to cPanel" option on the left-hand side of the page.
- Click on it to be redirected to your cPanel dashboard.
🖼️ Visual Reference:
4️⃣ Explore cPanel Features
🎨 The cPanel dashboard offers an array of powerful tools to manage your website:
- 📁 Files: File Manager, FTP, and Backup tools.
- 🗄️ Databases: MySQL, phpMyAdmin, and database wizards.
- 🌐 Domains: Add-on domains, subdomains, and redirects.
- ✉️ Email: Set up email accounts, forwarders, and spam filters.
- ⚙️ Software: Softaculous app installer, PHP settings, and more.
Explore each section to customize and optimize your website effortlessly.
🖼️ Visual Reference:
🌟 Alternative cPanel Login Method
If your domain name is already pointing to the correct nameservers, you can also log in to cPanel directly:
🔗 Use this format:
http://www.yourdomainname.com/cpanel
📝 Replace yourdomainname.com with your actual domain name.
Tip: Your cPanel username and password can be found in the welcome email sent by DomainIndia.
📧 Retrieve Your Welcome Email
Follow these steps to access a copy of the "New Account Information" email:
- Log in to your DomainIndia Client Area.
- In the top-right corner, click on your Name.
- Select "Email History" from the dropdown menu.
- Locate the "New Account Information Email" to view your hosting login details.
🖼️ Visual Reference: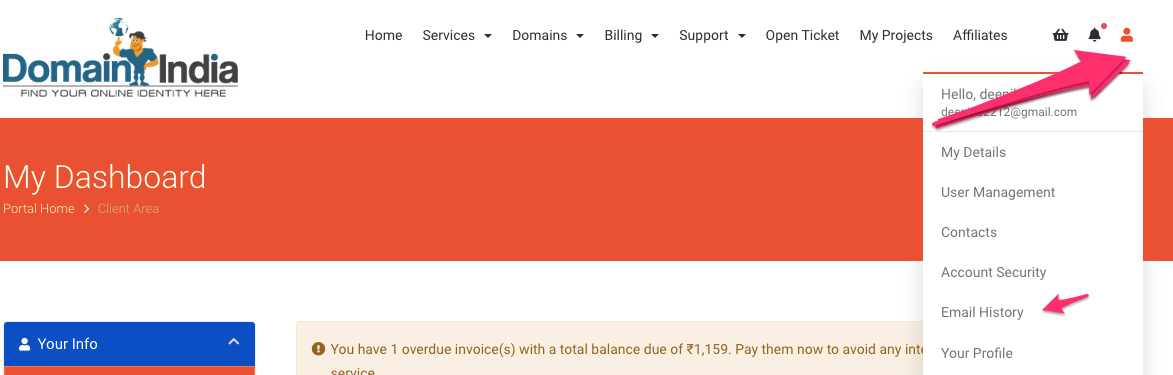
🛠️ Troubleshooting & Support
If you are unable to locate your login details or encounter any issues, feel free to reach out to us for assistance:
- 📞 Phone: Contact our support team.
- 💬 Live Chat: Available on the DomainIndia.com website.
- 📧 Email: [email protected].
🚀 Conclusion
Logging in to your cPanel is your first step to managing your website efficiently. Whether you're setting up email accounts, managing files, or installing apps, cPanel gives you the tools you need to succeed.
🔐 Stay organized by saving your login details and bookmarking the Client Area login page for quick access. If you need further help, DomainIndia support is always here to assist!
🎉 Start building, managing, and optimizing your website today with ease!
📌 For more helpful guides and tutorials, visit our Knowledge Base.
